B ACK TO HOME PAGE
Quick-And-Dirty
Creating a NEW Sequence:
Step 1 – Add a new entry into the *masters notecard inside the Sequencer-Masters Engine.

Example:
S,001,$My1stSeq
Step 2 – Add new entries into *seq1 notecard inside the Sequencer-Details Engine. Example:
01 | 20.8 | tap dance
02 | 24.5 | Jive-3
Note: the 001 connects and associates with the 1 in *seq1
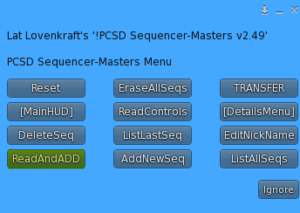
Step 3 – Press ReadAndADD button on the Sequencer-Masters Engine.
Step 4 – Press ReadAllAdd button on the Sequencer-Details Engine.

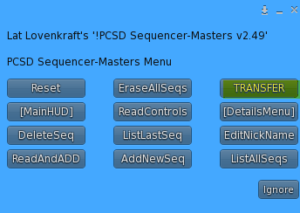
Step 5 – Press TRANSFER button on the Sequencer-Masters Engine.
Step 6 – Press the button on the MainHUD that matches the sequence nickname you created ($My1stSeq) to play it.|
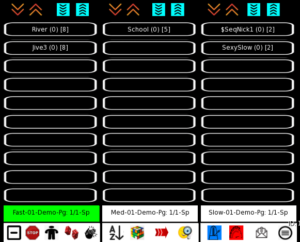
This assumes you added it as an entry into your *dances notecard inside your MainHUD. Example:
/* DANCES
A,01,01,5,Cool For School,School,0
A,01,02,8,Jive-3,Jive3,0
A,01,03,8,Riverdance,River,0
A,01,04,2,Sexy slow groove dance,SexySlow,0
A,01,05,2,*seq1,$My1stSeq,0
***************************************
***************************************
EraseAllData vs Reset
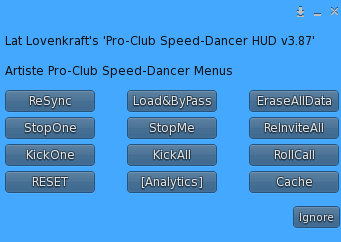
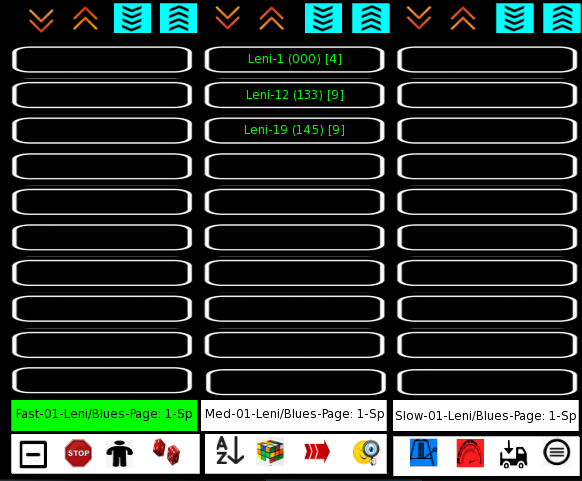
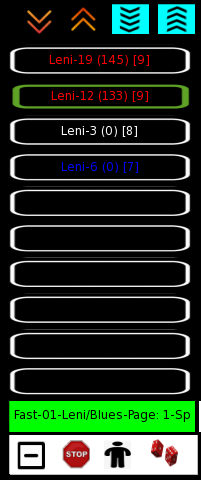
MAIN-HUD
EraseAllData button – Erases the MAIN-HUD database of dances/animations then rereads all the ‘A’ notecard entries and adds them to the MAIN-HUD database
Reset button – will reread and re-add the ‘A’ records, changing the database if any of the ‘A’ records have changed,
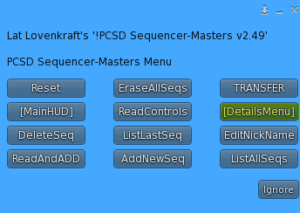
SEQUENCER-MASTER ENGINE
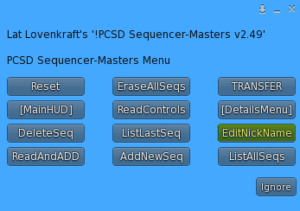
EraseAllSeqs button – Erases ALL sequences in both the SEQUENCER-MASTER ENGINE and the SEQUENCER-MASTER DETAILS databases,
Reset button – will only read the CONTROL type ‘C’ entries.
ReadControls button – will only re-read the CONTROL type ‘C’ entries without resetting the SEQUENCER-MASTER ENGINE
ReadAndAdd button- will read ALL the type ‘S’ entries. It will give a harmless error if the sequence-master already exists.
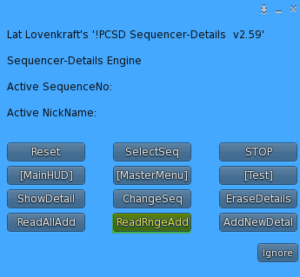
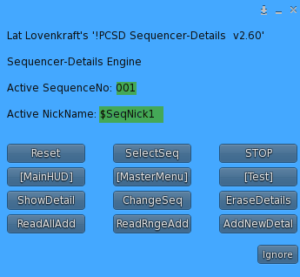
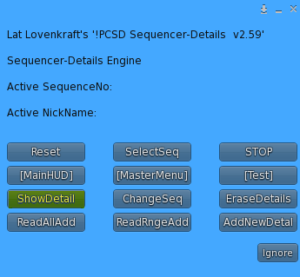
SEQUENCER-DETAILS ENGINE
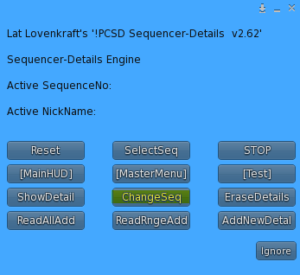
EraseDetails button – gives you an option to erase a single DETAILS entry OR erase ALL details, if you specify ‘ALL’. It does NOT affect the SEQUENCER-MASTER ENGINE.
Reset button – will read the type ‘C’ entries but does not affect records in the database. You must explicitly press a button to add Sequencer-Detail records to the database
ReadAllAdd button – will read ALL the *seq notecards and their contents.
ReadRngeAdd button – will read the range of sequences specified by the Range,?,? entry in the *sequences notecard in side the SEQUENCER-MASTER DETAILS ENGINE, inclusively.. This method can reduce a lot of notecard read time when you have a LOT of sequences by only reading the sequence(s) that are new or have changed.
AddNewDetal button – allows you to bypass using notecards and CREATE new sequencer-details using the menu.
ChangeSeq button – allows you to bypass using notecards and CHANGE an existing sequence that may have been created using a notecard OR via the menu AddNewDetal button
***************************************
***************************************
Overview
A sequence is more than 1 dance that play in sequence with specified durations for each one. This sequence will play with one button-press just like a normal single animation.
This requires the new SEQUENCER-ENGINE to CREATE and PLAY your sequences. The SEQUENCER-ENGINE consists of a SEQUENCER-MASTER ENGINE and SEQUENCER-DETAILS ENGINE. These must be attached or rezzed in the same sim as the Main HUD wearer.
A SEQUENCE has a unique identifier that is a number between 001 and 900. Each sequence will have a NickName. The Nickname is what appears on the MainHUD button that you will press when you want to play a sequence. The NickName helps you remember what the sequence is about since just referring to a number 001-900 is not that helpful.
Each Sequence has 1 or more DETAILS. A DETAIL has 1 duration (seconds) and 1 real animation name. You can have about 40 to 45 details per sequence, though it is unlikely you will ever have more than 10 DETAIL entries for a given SEQUENCE.
Below are the instructions on how to create and manage SEQUENCE MASTERS and SEQUENCE DETAILS.
Sequences live/exist in the SEQUENCER-ENGINE. To use them they must be TRANSFERRED to the MAIN HUD. Two ways this happens:
1 – Pressing Reset button on the MAIN HUD
2 – Pressing TRANSFER button on the SEQUENCER MASTER
***************************************
***************************************
Case-Study

Sequencing is the technique of specifying more than 1 animation that you want to play in a particular sequence and then have it loop in the same way that a single animation usually loops when dancing by specifying the actual name of the animation AND the duration, how long you want an animation to play before starting the next animation in the sequence.
Animations are often sold in packs of from 2 to 6 dances. They may have been designed to present and play in sequence. By pressing one button, you can make them play in sequence, one after the other, instead of having to press a button for each dance, trying to time/guess when one animation ends so you can start the next animation in the sequence.
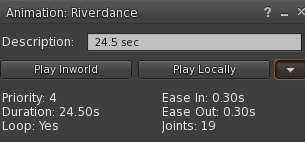
The system only needs to know the name of the animation, and how long you want it to play. Usually you want it to play the full length. You may have to click on an animation twice to get the duration but it is available in all animations.

In the above example, the name of the animation is Riverdance. The duration, taken from the value after Duration: is 24.50 s (seconds);
You may have problems playing an animation whose priority is lower than the currently playing animation.
******************
The system identifies a sequence as a nickname just like there is a nickname for a single animation. The only difference is that sequences always start with a ‘$‘ (dollar sign).
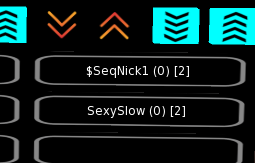
The sequence, arbitrarily named $SeqNick1, can be entered anywhere that a normal animation might appear. A maximum length of 10 characters for the sequence nickname is allowed.
A sequence will have a speed and, can optionally, have a BPM (Beats-Per-Minute) assigned to it, just like a normal single animation.
You need 3 items to CREATE a sequence. You need the same 3 items to PLAY a sequence.
–MainHUD
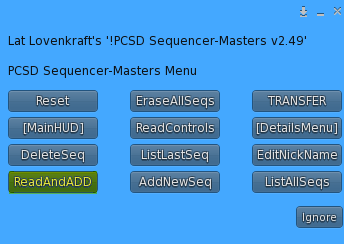
– Sequencer-Master-Engine
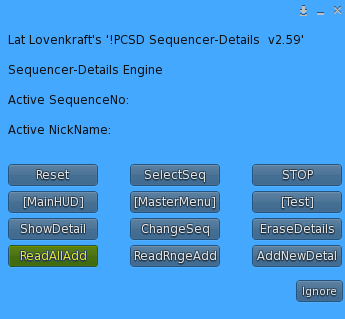
– Sequencer-Details-Engine
All 3 can be attached, or rezzed on the ground in the same sim/region as the person using the system. They are MOD so you can resize them and/or change their transparency. The Sequencer-Master Engine and Sequencer-Details Engine do not ever have to be accessed directly. Their menus can be accessed via the MainHUD. It is often easier, though, to use the MainHUD when you are not making many additions or changes. Both Sequencer-Master Engine and Sequencer-Details Engine can have their menus ALSO accessed by simply clicking on them.
Bring up the Sequencer-Master-Engine menu by either 1: Clicking on the Sequencer-Master-Engine or Sequencer-Details-Engine
OR
By pressing the [Sequencer] button on the Main HUD from the [Analytics] Sub-Menu, assuming the Sequencer-Masters Engine is in the region and attached or rezzed.
You can have a mix of attached and rezzed. It is recommended that you wear them as attachments when in normal use…but…you may find it easier to rez them on the ground when creating sequences as you can more easily load non-full-perm animations .
There are 2 ways to create sequences. The traditional way by editing notecards. The modern way by using the HUD menus. This modern way can save you time when you only need to add or change a few sequences. It also expedites faster testing and retesting of a sequence. You can mix the 2 methods, editing notecards and using the HUD menus.
********************************
Method #1: Notecard Editing
The system comes with 2 sequences defined, with only 1 chosen to be used in the MainHUD. Walk-Thru:
$SeqNick1
Look in the *masters notecard inside the Sequencer-Master add-on:
C,08,AllowSendToHUD,no
C,09,AllowCopyFromHUD,no
S,001,$SeqNick1
S,002,$SeqNick2
END
To add a new sequence, edit the *masters notecard and add the following new entry:
S,001,$SeqNick1
S,002,$SeqNick2
S,003,$MySeqNick
END
If you do not remove the existing masters, S,001,$SeqNick1 and S,002,$SeqNick2, you will get an annoying error but your new sequence will still add ok. It is suggested that you remove existing sequence entries but save them in case you ever want to restore and start over. Each unnecessary line-entry read costs extra load time.
Example:
Reading ALL Sequence-Masters Line-Entries and ADDING them to the DATABASE
Sequence-Master WRITE ERROR: NickName: $SeqNick1 (001) already exists
Sequence-Master WRITE ERROR: NickName: $SeqNick2 (002) already exists
SequenceMaster: 003 – $MySeqNick was ADDED Successfully !!!
13 Sequence-Master Records Read
1 NEW Sequence-Masters Added
Done
So it is better to just have:
C,08,AllowSendToHUD,no
C,09,AllowCopyFromHUD,no
S,003,$MySeqNick
END
Make the change by removing S,001,$SeqNick1
and S,002,$SeqNick2 and don’t forget to SAVE the notecard.
Press ReadAndADD button on the Masters menu.

Example:
Reading ALL Sequence-Masters Line-Entries and ADDING them to the DATABASE
SequenceMaster: 003 – $SeqNick3 was ADDED Successfully !!!
2 Sequence-Master Records Read
1 NEW Sequence-Masters Added
Done
NOTE: In this demo, there are already Sequencer-Detail entries for Sequence 003. This was done to show you that you can create Details before you create a Master if, for example, you cannot decide, yet, what to name your master.
***********************
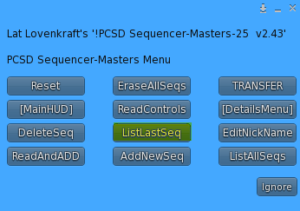
Pressing the ListAllSeqs button will produce the following confirmation of what the system thinks it has.
001 – $SeqNick1
002 – $SeqNick2
003 – $MySeqNick
These are the Sequencer-Masters database entries and they survive Resets. The only way they can be removed is by explicitly pressings EraseAllSeqs button. This will erase all Sequence-Masters.
This will ALSO Erase all Details. Details are in another ADD-ON and contain the duration/animation name entries associated with each master entry. You can have 1 or more detail-entries per Master. A realistic maximum is about 40 to 45 detail entries per Master, although, it is rare or unlikely you will have more than 6.
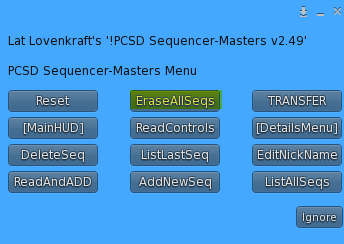
Press EraseAllSeqs.
a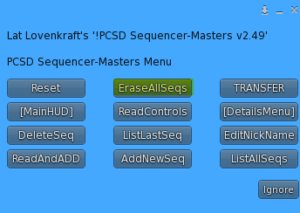

ALL SEQUENCE MASTERS and thus ALL SEQUENCES…HAVE BEEN ERASED !!!
PCSD Sequencer-Detail…All Sequencer-Details have been ERASED DUE TO Sequencer-Masters being ERASE. The Sequencer-Details DATABASE has been DELETED
Now, re-edit the *masters notecard so it looks like this
001 – $SeqNick1
002 – $SeqNick2
END
Now press ReadAndADD
Reading ALL Sequence-Masters Line-Entries and ADDING them to the DATABASE
SequenceMaster: 001 – $SeqNick1 was ADDED Successfully !!!
SequenceMaster: 002 – $SeqNick2 was ADDED Successfully !!!
3 Sequence-Master Records Read
2 NEW Sequence-Masters Added
Done
Pressing the ListAllSeqs button again will produce the following confirmation of what the system thinks it has.
001 – $SeqNick1
002 – $SeqNick2
END
Now remove the previous 2 entries and just add the following entry and press SAVE to save the notecard changes.
S,003,$MyNick3
END
Now press ReadAndADD
Reading ALL Sequence-Masters Line-Entries and ADDING them to the DATABASE
SequenceMaster: 003 – $SeqNick3 was ADDED Successfully !!!
2 Sequence-Master Records Read
1 NEW Sequence-Masters Added
Done
Pressing the ListAllSeqs button again will produce the following confirmation of what the system thinks it has.
001 – $SeqNick1
002 – $SeqNick2
003 – $MySeqNick
Now let’s add another Sequence. (Remove the last entry S,003,MySeqNick)
S,004,$MyLastNik
END
Now press ReadAndADD
Reading ALL Sequence-Masters Line-Entries and ADDING them to the DATABASE
SequenceMaster: 004 – $SeqNick4 was ADDED Successfully !!!
2 Sequence-Master Records Read
1 NEW Sequence-Masters Added
Done
Pressing the ListAllSeqs button again will produce the following confirmation of what the system thinks it has.
001 – $SeqNick1
002 – $SeqNick2
003 – $MySeqNick
004 – $MyLastNik
**************
Since we Erased all Sequences previously, this means that, while we now have 4 Sequence Masters, we have NO Sequence Details so we can not play any sequence.
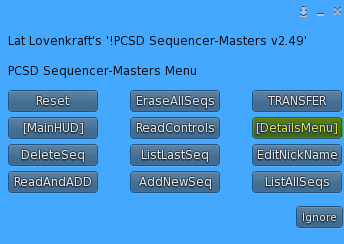
Press the [DetailsMenu] button.
Here is where we can manage our sequence-details for any given Master. There are still detail notecards present for 3 sequences, unless you removed them.
C,01,TestHUD,yes
C,02,TestSequencer,yes
C,03,TestSeqAudit,yes
C,04,WarnWhenMissingAnimation,no
C,05,Range,1,2
C,06,LockHudOnScreen,no
END
The Range entry in the *sequences notecard inside the Sequencer-Details Engine specifies which *seq notecards to read when choosing the ReadRngeAdd button. This makes loading faster when we only want to read a few notecards versus re-reading unnecessary notecard sequences. Always check this entry if things are not working out. It is easy to forget. Be sure to SAVE the notecard if you have to change it then press Reset. This will read in any new values for the Range entry. Range,1,2 means we want to read *seq1, *seq2, and write their contents (durations and animation names) to our Sequencer-Engine database.
OR
If you don’t mind reading all *seq notecards, even those that have not changed, and you don’t mind paying the extra load-time penalty then choose ReadAndAdd button. This will IGNORE the Range restriction and read ALL *seq notecards
At this point, we have no details for 004, yet. We will add those using the MENU method later.
*****************
Now let’s list the 1st a sequence, 001 (*SeqNick1)
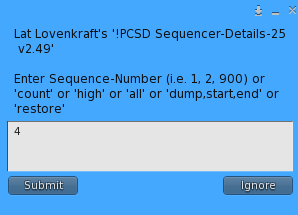
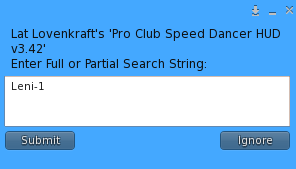
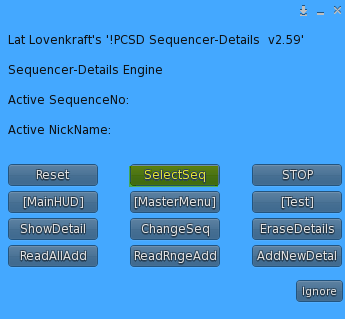
Press SelectSeq button

We get the following popup.
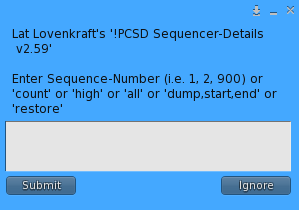
This popup is used to:
1 – Show details of a sequence, by number
2 – Choose a sequence to test, by number
3 – Change a sequence entry (1 duration/anim)
4 – Show number of entries in the Sequencer-Engine Database
5 – Show the highest sequence-number that has detail entries (usually the last entry worked on)
6 – All will list an overview of each detail, Sequence-Number and number of line-entries
7 – Dump will save database entries between 2 sequence-numbers inclusively by listing the information into local chat, to be copied into a notecard to be restored later, should the need arise. This allows you to safeguard any changes made to the database using the HUD MENUS.
8 – Restore will update the database with the previous contents from a Dump command by reading what you have copied and pasted into the *restore notecard.
The ActiveSequence is what certain subsequent
commands will depend on.
It consists of a sequence number, Example: 001 and a sequence nickname. Example: $SeqNick1. It is possible that the nickname is not present if you chose to create Detail records before creating a Master record.
Sequence NickName: $SeqNick1
Press ShowDetail
 |
|
Sequence/NickName: 001 – $SeqNick1
SID. m:ss Seconds Duration Animation
01 | 0:0 | 0.0000 | 10.000 | Cool For School
02 | 0:10 | 10.000 | 3.0000 | Jive-1
03 | 0:13 | 13.000 | 5.0000 | Riverdance
End 0:18 | 18.000
**********************************
Ok, now let’s create our own Sequence Details for Sequence No. 003, NickName of $MySeqNick
We don’t need the existing sequence notecards. Rereading them would slow the process, especially when you start having a lot of sequences. We will save them for emergencies should we ever need to rebuild. But we don’t need to remove them. We just change our Range entry in the *sequences notecard from Range,1,2 to
Range,3,3.
Our new sequence-detail entries for Sequence 3 looks like this:
01 | 20.8 | tap dance
02 | 24.5 | Jive-3
In order to read in and make the new Range values active, we need to press Reset on the Sequencer-Details Menu.
Resetting Sequencer-Details Engine !!!
2452 Free Memory in: !PCSD SequenceDetails v2.60
130948 – Free DETAILS-DATABASE Available
WARNING: SEQUENCER-DETAILS HUD IS UNLOCKED
6 Configuration Entries Read Successfully !
$$$ Sequencer-Details Engine READY $$$
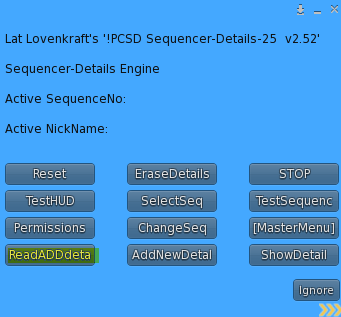
Now Press the ReadADDdeta button

Reading range of Sequence-Details notecards between: *seq3 and *seq3 inclusively
$$$ 1 Total Sequence-Details (*seq) read Successfully $$$
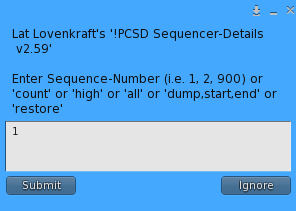
Press SelectSeq button
Enter a value of 3, this time.
Sequence/NickName: 003 – $SeqNick3
SID. m:ss Seconds Duration Animation
01 | 0:0 | 0.0000 | 20.800 | tap dance
02 | 0:20 | 20.800 | 24.500 | Jive-3
End 0:45 | 45.300
*************************************
Let’s test our NEW Sequence !
3 Steps (4 Steps to Test the Sequencer the very first time after a Reset)
These are the Button Presses.
Step 3 only needs to be done once after a Reset.

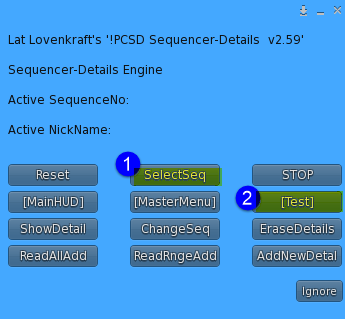
1 – Press the SelectSeq and enter the SequenceNumber of the sequence that you want to test
2 – Press [Test] to bring up the Test sub-menu

3 – Press the Permissions button. Accept Permission to animate.
4 – Press the CopyFromMai button, to copy the animations necessary to test the selected sequence, assuming they are already in the MAIN-HUD. Or manually copy the needed animations into the Sequencer-Details Engine
*****
IMPORTANT !!!!!!!!!!! WARNING !!!!!!!!!!!
If a filename already exists, then a new filename is created in the Sequencer-Details Engine by appending a number to the end of the new file that was copied.
FileName produces FileName 1 if FileName already exists in the destination.
FileName 1 will ALWAYS be DELETED if it exists, unless it is NOCOPY or NOMOD
Example: Your animation is named Bollywood7.
Then, Bollowood7 1 will always be deleted UNLESS it is NOCOPY, when using either the CopyFromMai buttons.
NOCOPY animations NEVER get copied between the MAIN HUD and the Sequencer-Details Engine
*****
5 – Press TestSequence (or TestHUD).
6 – Press STOP button on Sequencer-Details Engine to STOP a sequence tested using the TestSequenc button
Main-HUD to STOP a sequence tested using the TestHUD button
m:ss Seconds Duration Animation
0:00 – 0.000 – 20.80 – tap dance
0:20 – 20.80 – 24.50 – Jive-3
0:45 – 45.30 – 20.80 – tap dance
1:06 – 66.10 – 24.50 – Jive-3
It shows a timeline of when each dance starts so you could gauge a sequence lasting close to the length of a particular song that you like.
In this example, you can test the other sequences by starting with step 1 and entering 1 or 2 because these sequences already exist.
****************************************
Method #2: Menu Editing
We will first add a 4th new Sequencer-Master to our 3 existing Sequence Masters.
Pressing ListAllSeqs on the Sequencer-Masters Engine should produce:
001 – $SeqNick1
002 – $SeqNick2
003 – $MySeqNick
004 – $MyLastNik

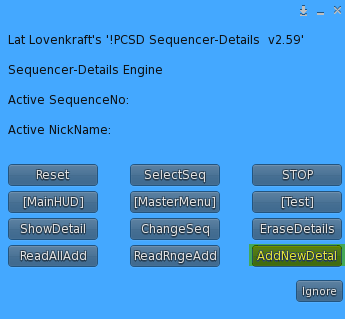
Press the AddNewDetal button
Enter 4 and Press Submit
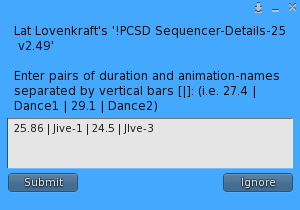
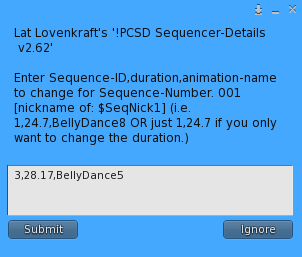
Enter the information above and Press Submit
INFORMATION: No Sequencer-Details already exist for Sequence No: 004 to ADD details to.
(this simply means that no Sequencer-Detail entries already exist for Sequence No. 004 . It lets you know this is the 1st time and that you are not adding entries to an existing Sequence No. 004)
CREATING NEW Entries for Sequence Number: 004
New Keys Written…
004-01
004-02
(Note: The first time I entered this i got an error because i made a typo and misspelled the an animation name WARNING: Animation: 2 – JIve-3 was NOT FOUND in the Sequencer-Engine inventory. It should have been Jive-3 not JIve-3. But it added it because it realizes it is ok to add entries without actual animations existing in the Sequencer-Engine because you may intend to only test the sequences using only the MainHUD which is an option)
Pressing ShowDetail:
Sequence/NickName: 004 – $MyLastNik
SID. m:ss Seconds Duration Animation
01 | 0:0 | 0.0000 | 25.860 | Jive-1
02 | 0:25 | 25.860 | 24.500 | JIve-3
End 0:50 | 50.360
THATS IT! You are ready to TEST Sequence No. 004
Quick and Easy!
****************************************
CONFIG
If the actual animations exist in the MAIN HUD and you want to test them in the Sequencer-Engine, then you can use the CopyFromHud button. AllowCopyFromHUD,yes is the required setting in the *masters notecard in the Sequencer-Engine.
In the *masters notecard is another entry.
C,07,SendAnimationsToHUDMethod,copy
When this value is copy, the original animation REMAINS in the sequencer-engine after copying
C,07,SendAnimationsToHUDMethod,move
When this value is move, then the original animation is DELETED after the sequencer-engine copies it to the MAIN HUD.
****************************************
CHANGING
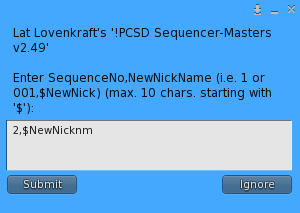
You can change (edit) the Master NickName using the
button on the Sequencer-Masters Engine Menu
Enter the sequence number, followed by a comma followed by the new NickName (must begin with a $ and be 10 characters or less.
You can change a detail entry (SeqID, duration, animation)
using the ChangeSeq button on the Sequencer-Details Engine Menu. First you must select a sequence to change using the SelectSeq button. Then… press the ChangeSeq button on the Sequencer-Masters Engine Menu


Enter the SeqID then the duration and then the actual animation name. If you only want to change the duration, then you can omit the animation name.
B ACK TO HOME PAGE


